Noah's MkIV
Volkswagen H&R Coilover
Installation HOWTO
Written
by
Noah Lehmann-Haupt
nlh at noahlh dot com
vwvortex username: noahlh
Last updated: August 9, 2003
Introduction
I'm writing this
because I've just recently completed installing my H&R Coilovers in my '00
Jetta, and was extremely frustrated by the lack of detail in the existing online
HOWTO guides. I had my Bentley, I had printouts of several instruction guides,
I had my college degree (to assure you all I'm no fool), and I still found several
steps mind-numingly frustrating.
So I decided that instead
of complaining, I'd do something about it by writing my own tutorial. So here
ya go. I hope this helps. Also, if you think about it, the ratio of "taking"
on the web to "giving" for the average person (including myself) is
pretty high ... I figured it was about time I gave something back to the community.
A few points:
1) I'm no mechanic, so some
terminology may be wrong. Sorry.
2) PLEASE, if you spot something I've done wrong or written incorrectly, CORRECT
ME -- I have no ego about this stuff and would to make this guide better, more
complete, and more accurate.
Update: Many many thanks
to the folks who have taken the time to read this and provide me with corrections
and suggestions. It is SO appreciated.
3) This guide includes a lot of (maybe too many) pictures. I'm
a very visual person, and it really helps to see what needs to be done instead
of reading things like "remove top upper flange from rear bushing by ensuring
that mounting plate is properly seated in suspension strut mount rear upper
bearing plate camber socket wrench."
Tools
There are some tools that
you need for this job, some that make it easier (but aren't required), and some
that are luxury items. I'll try to indicate which is which.
16mm, 17mm, 18mm 1/2-inch
drive sockets (required) - Note the 17mm might not be required in some cases
16mm, 17mm, 18mm open-ended wrench (helpful)
VW Special Tool #3424 a.k.a. The Spreader Tool (required) - available for $10
from Autotech or $20 from Zelenda.
Or, if that's not available, a 1/4-inch slotted screwdriver bit in a 1/4 ratchet
drive can work too.
Rubber mallet or something blunt to gently whack stuck/rusted pieces
One of the following, to get the outer and inner top nuts off the front strut
assemblies:
- An impact wrench/gun (air powered, but electric may work too) w/ 21mm impact
socket
- Potterman's "Strut Nut Tool" - $28 on www.parts4vw.com (part #T.91600-22)
- Stahlwille 60-degree deep-offset wrenches, part numbers <
> (20/21mm) and <> (22/23mm) (I
need to look these up -- will add later).
T-20 Torx screwdriver (not required if you have an impact gun -- used to remove
the liner from the rear passenger's side wheelwell)
Vicegrips / pliers / something metal and strong to hold things
Spring compressor (required unless you purchased new front strut bearing, mounts,
and inner strut nuts)
Tire iron / breaker bar / something to get the wheel lugs off (required)
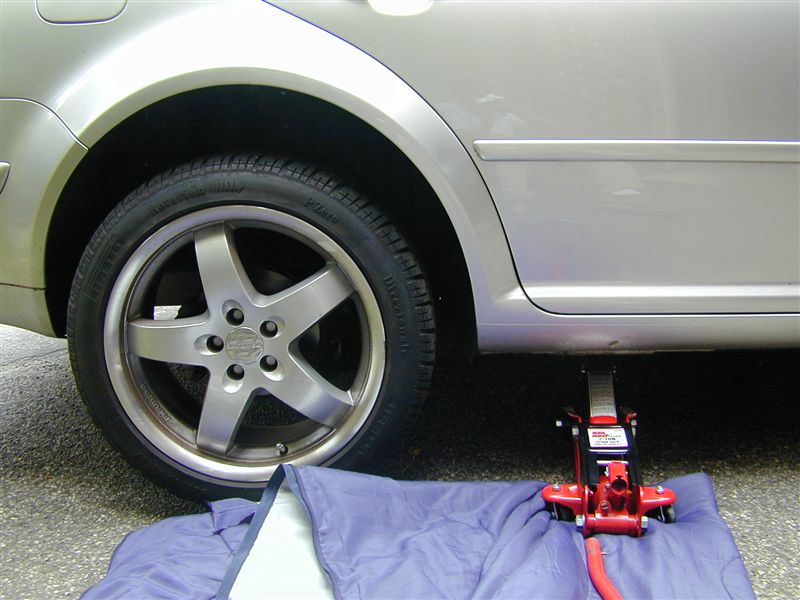
2-ton minimum Floor Jack (DO NOT USE THE JACK VW INCLUDES WITH THE CAR UNDER
ANY CIRCUMSTANCES. IT CAN BREAK VERY EASILY AND YOU CAN BE CRUSHED AND THAT
WILL SUCK BEYOND BELIEF)
Jack Stands (x4) or a Lift (car's gotta get off the ground
somehow)
Anti-seize lubricant (not required, but recommended)
Part Numbers
The subject of nut/bolt
replacement is a tricky one -- The Bentley says that there are several nuts
and bolts that must be replaced once they've been used once.
The reason is that the suspension is a very high stress part of the car, and
many of these bolts are stretch bolts that lose their maximum effectiveness
after they've been installed and torqued to the proper level. There are many
people, however (myself included), who have reported no problems with reusing
the existing pieces. So my opinion is that if you can get ahold of all the pieces
(total cost should be no more than $30 from the dealer), replace 'em. If not,
it's probably not going to mean the end of your suspension.
Here are the parts that
should be replaced and their associated VW part numbers. (Note: most dealers
will not have these in stock, so give yourself a week or two
lead time to allow them to be ordered.)
Front Suspension:
| Part |
Size |
Quant. |
Part No. |
| Outer nut,
self-locking |
21mm |
x2 |
N90 353 603 |
| Lower strut
mounting bolt |
18mm |
x2 |
N10 207 803 |
| Lower strut
mounting nut |
18mm |
x2 |
N10 106 402 |
Note: Several people
have reported that in some cases, the outer nut is 22mm instead of 21mm. Be
sure to check your car, as this might be a country- or year-specific difference.
Rear Suspension:
| Part |
Size |
Quant. |
Part No. |
| Upper shock
mounting bolt |
16mm |
x4 |
N90 648 401 |
| Lower shock
bolt |
16mm |
x2 |
N90 517 302 |
| Lower shock
nut |
16mm |
x2 |
N10 286 102 |
Note: Likewise,
some have reported that one or more of the rear bolts are 17mm instead of 16mm.
Other parts:
Upper strut bearing
(just in case you break it, like I did) 1J0 412 249
New/upgraded Upper Strut Mounts (the big rubber things. Several people suggest
upgrading to the slightly stronger VW Motorsport variety, which can be purchased
from Autotech, Potterman's, or elsewhere. The Potterman's part #1J0412331CMS
- $50 / side for both parts)
Let's Rock -- Part
I, Front Suspension
The passenger's
side is more difficult, and I started with that, but only took pictures of the
driver's side. So we'll start there.
Driver's
Side:
- Loosen the 5
wheel lugs on each wheel, jack the car up, and take the front wheels off.
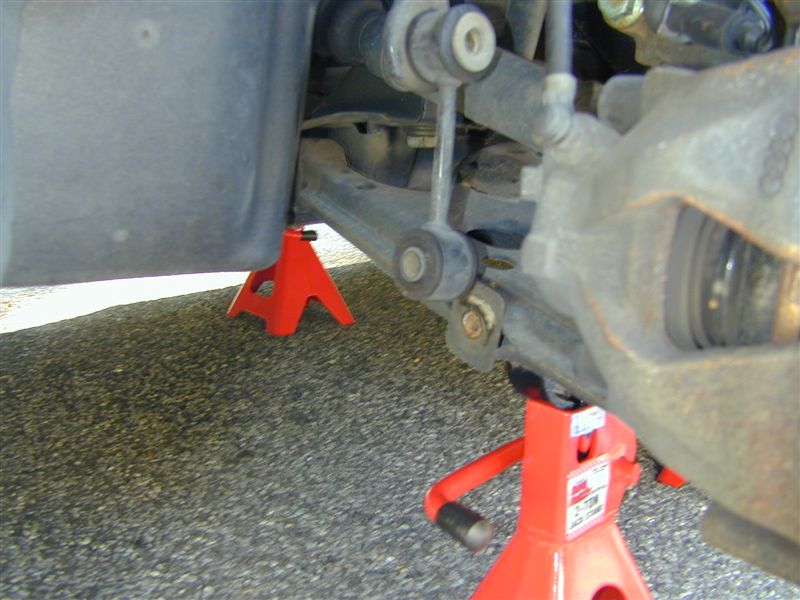
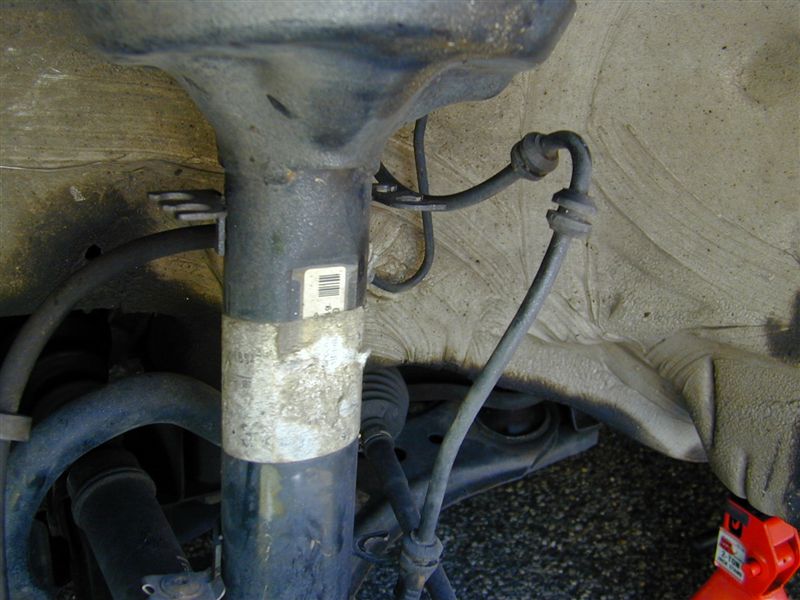
-
Place
a jackstand or floor jack (preferable) underneath the control arm. This
is because when you remove the strut from the housing, the control arm (including
the rotor and brake caliper) will drop and you don't want it to slam into
the ground and tear off your brake line. If you use a floor jack, you can
then slowly lower the control arm down.
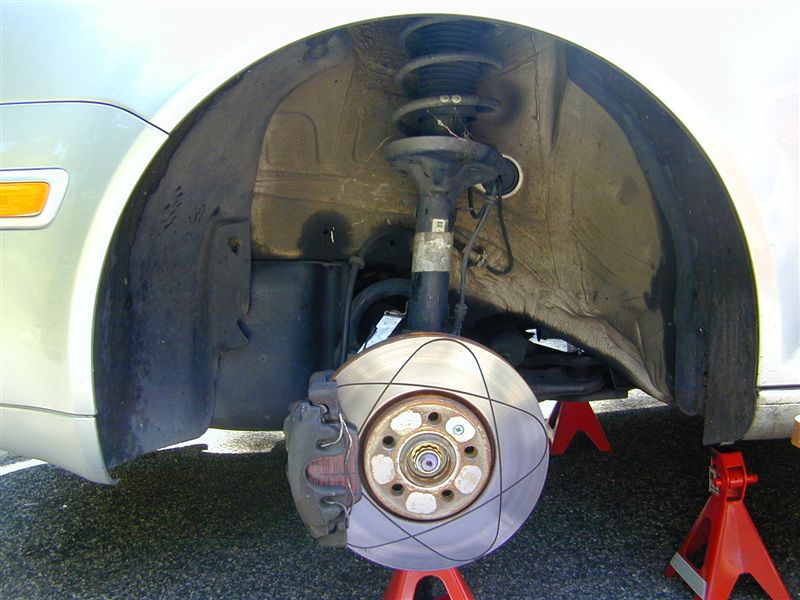
Yes, love me for my ATE slotted front rotors. w00t.
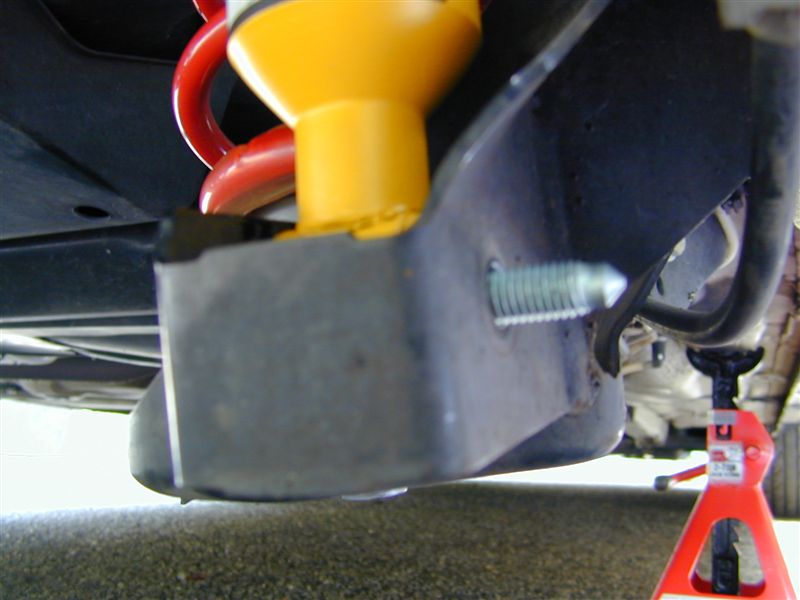
- Remove the 16mm
bolt that attaches the front sway bar to the control arm
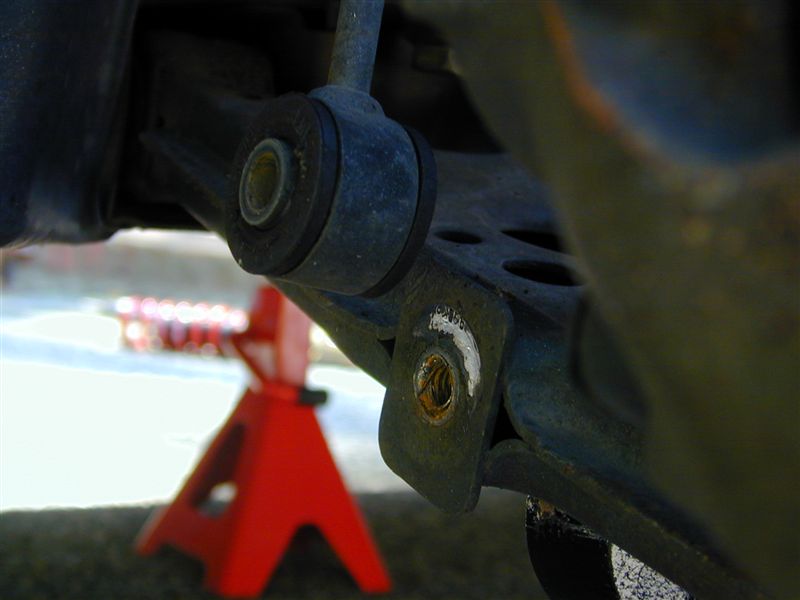
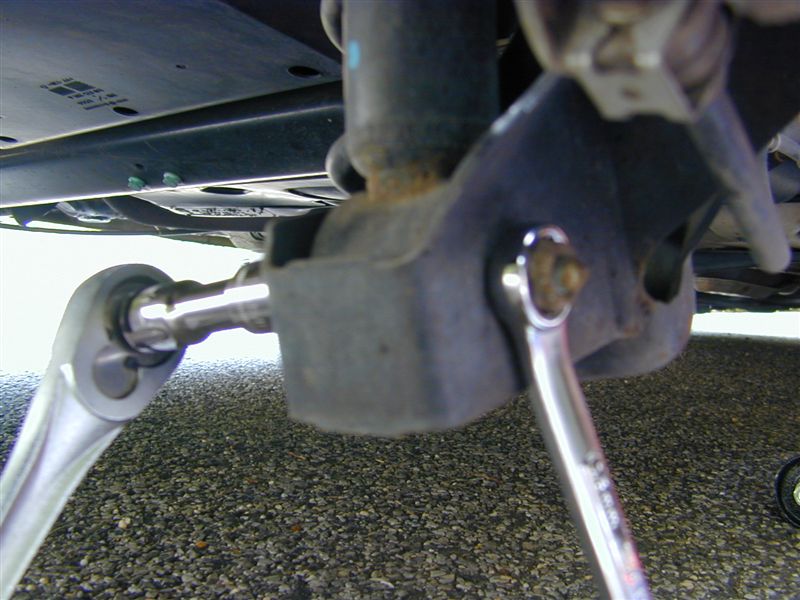
- Remove 18mm
lower strut mounting bolt, using an 18mm open-ended wrench to counterhold
the nut (not visible in the picture below)
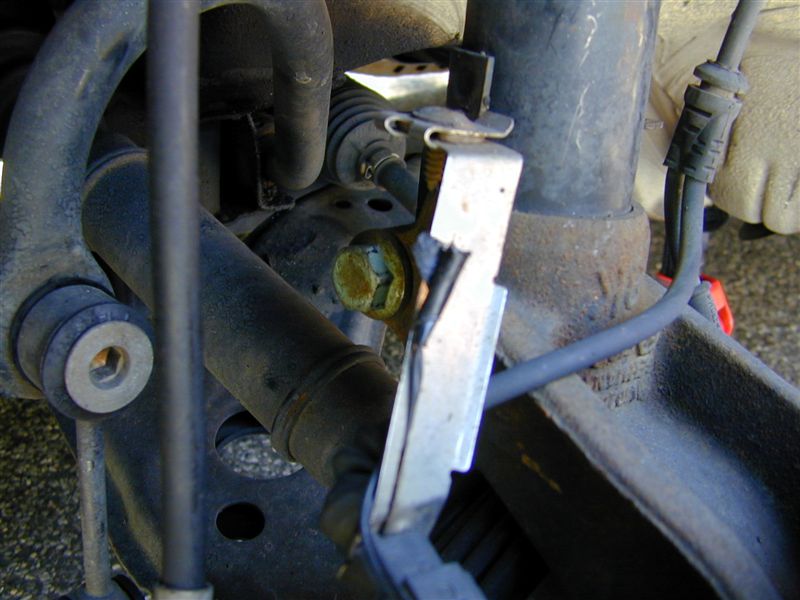
- Un-snap the
ABS speed-sensor cables from the strut mounting thingys.
- Prepare the
Spreader Tool. By this, I mean make sure you have one. Some have said this
job is possible without one, but I dare you to try. I did, and ended up postponing
the entire install for a week while I waited for mine to arrive from Autotech.
Why do you need this magical tool? Because the strut mount is extremely
tight, and the only way to get it to the point where you can remove the strut
is by spreading it (i.e. prying) apart using the tool. The tool is basically
a 7mm allen wrench bit that's been ground down to be more oval shaped. You
pop it in the gap in the strut mount, twist, and BAM ... out comes the strut.
Update: Several folks have mentioned that as an alternative to this
tool, you can use a 1/4-inch slotted screwdriver bit in a 1/4 ratchet drive.
Not tried personally, but sounds like it'd be a good solution.
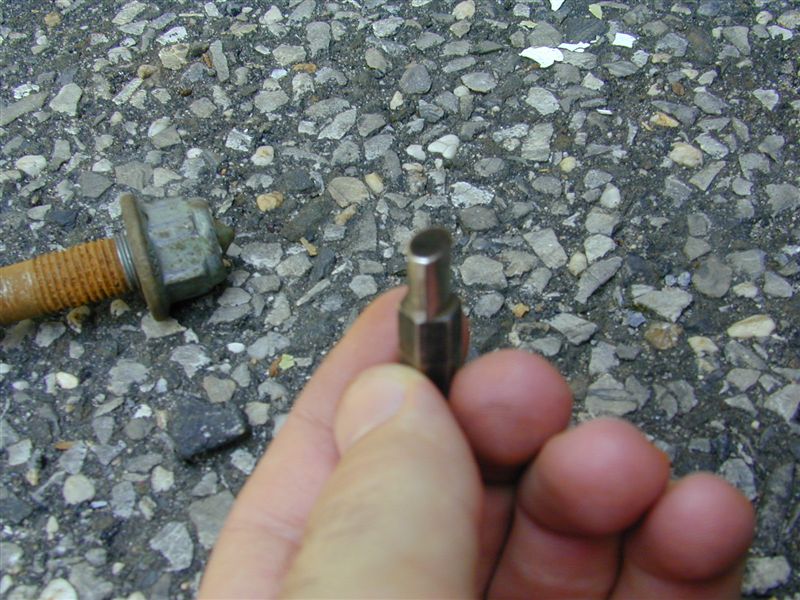
It's much smaller than it looks in the Bentley, hence its being named
"the $10 piece of metal" by my female friend watching me do the
install.
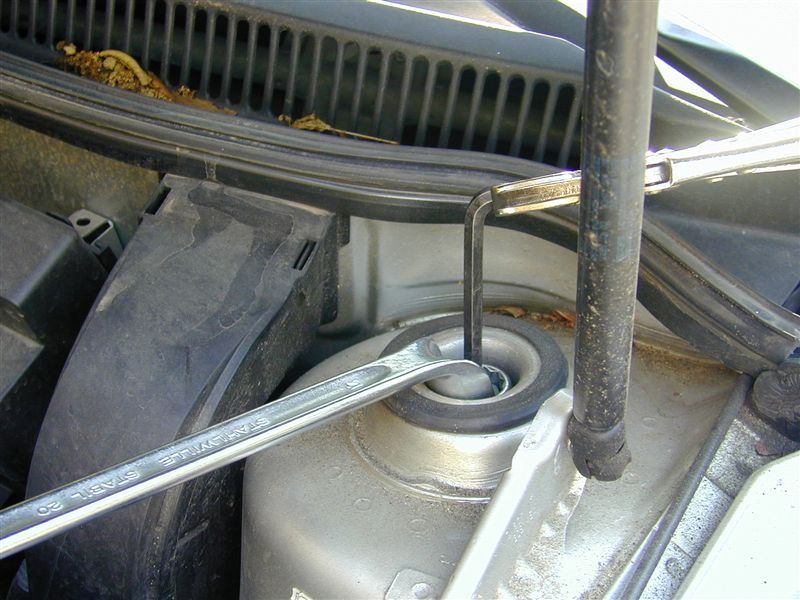
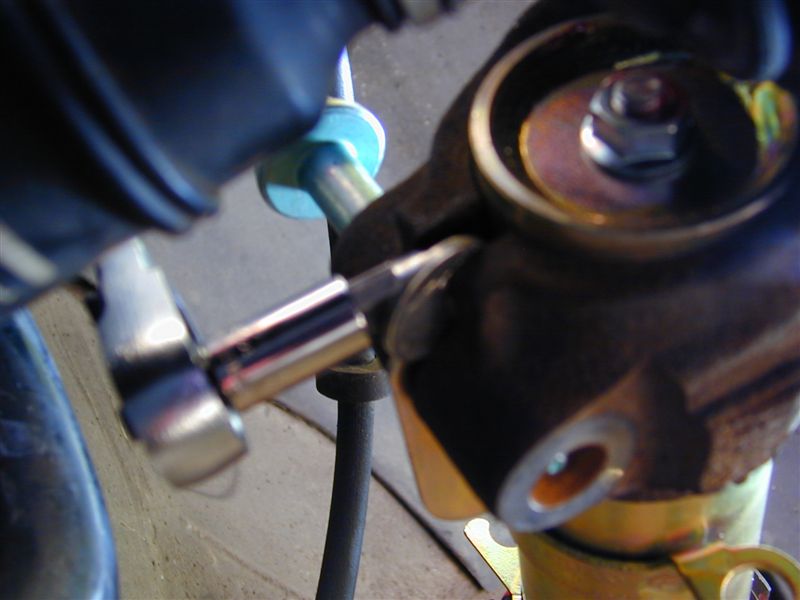
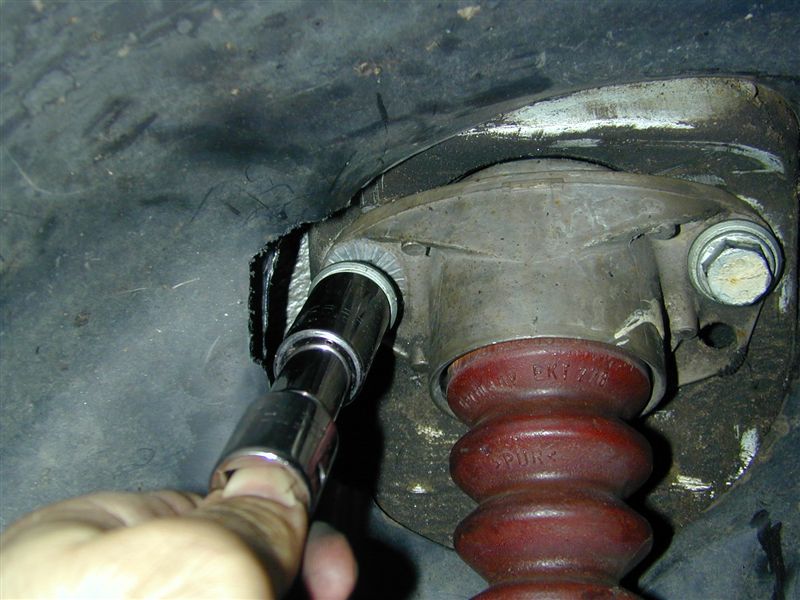
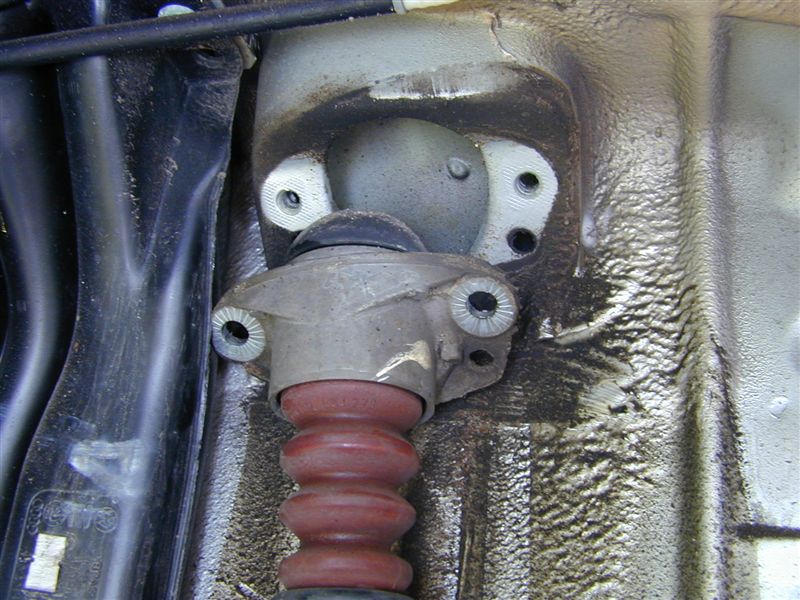
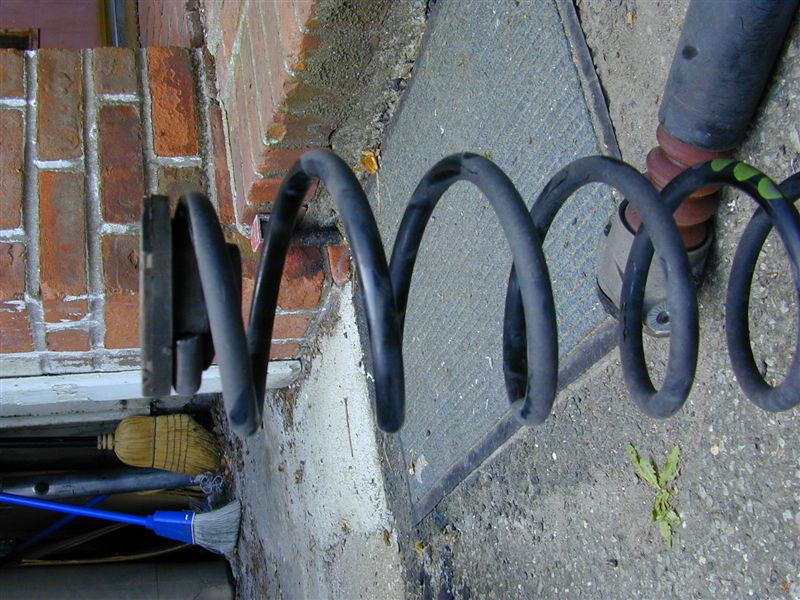
- Insert the spreader
tool and rotate (spread) as shown below:

- With the Spreader
Tool in place, lower the floor jack that's underneath the control arm a bit
and give the arm a whack with a mallet. Not too hard -- if you've used the
Spreader Tool properly, the strut should fairly easily come loose.
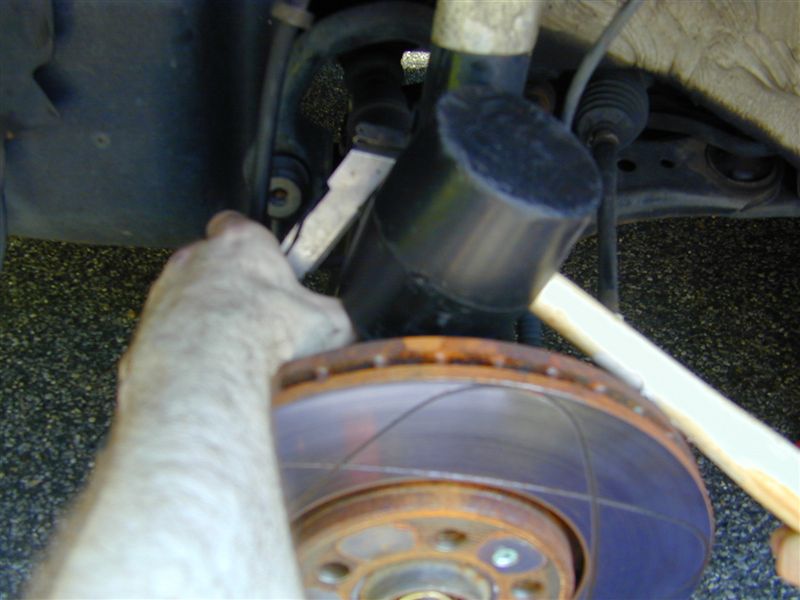
Treat your thumb nice and it'll reward you by not getting all purple and
bleeding.
Post-whack
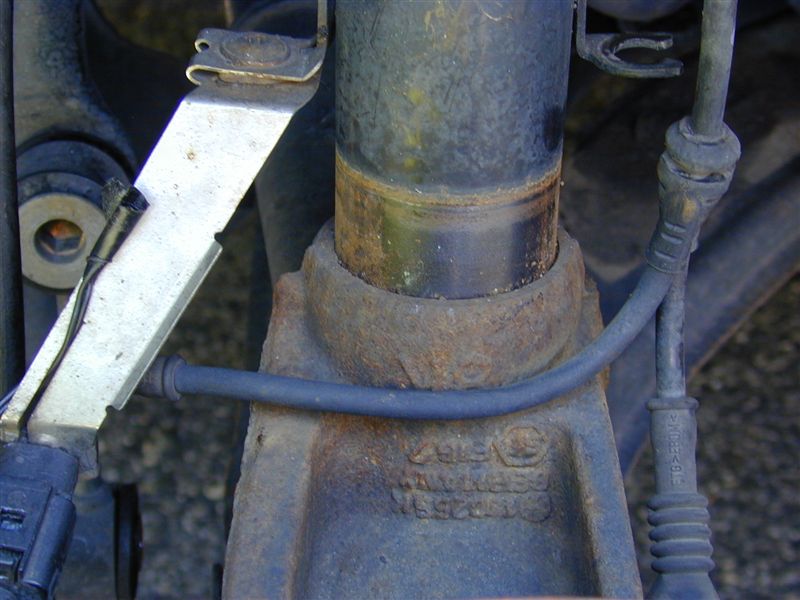
- Lower the floor
jack further, until you can remove strut from the mount.

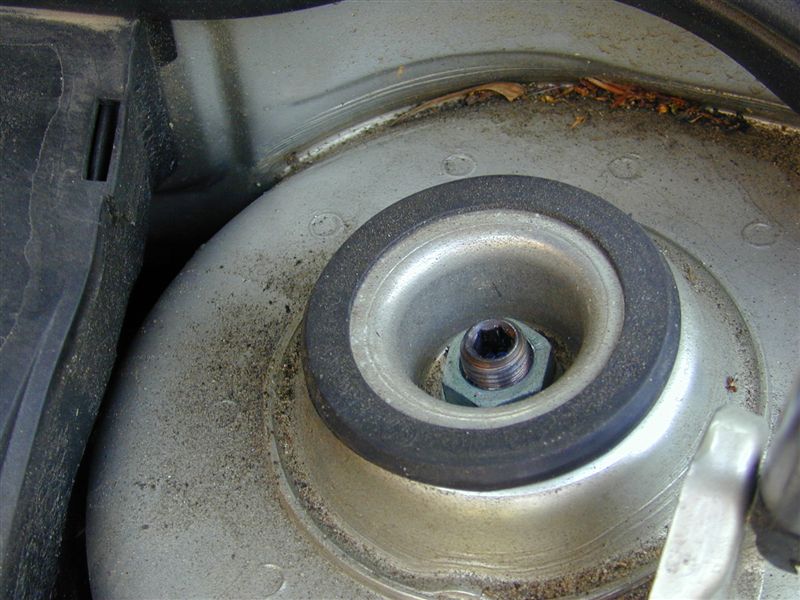
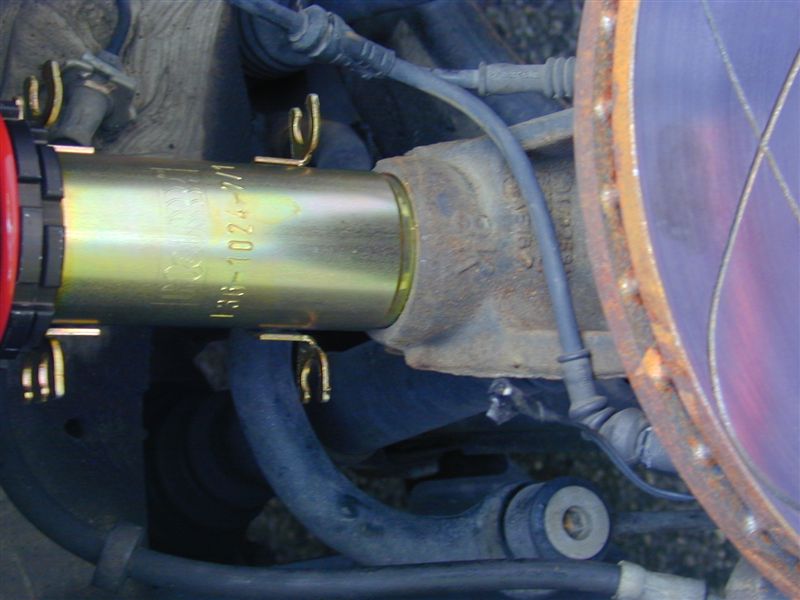
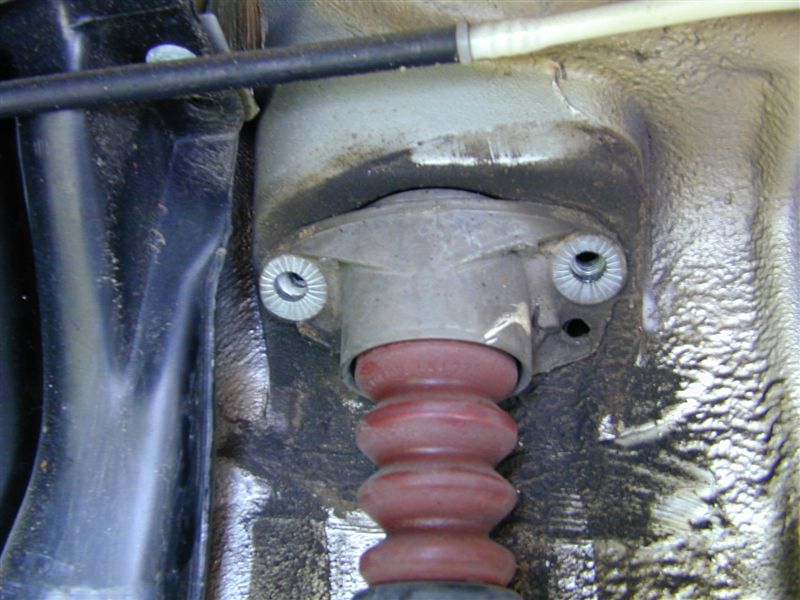
- Ok, time to
take the strut out -- pop the hood, and remove the strut cap. You should see
the 21mm outer nut, as pictured.
- You have several
options for getting this 21mm nut off. The difficulty with this step lies
with the fact that a simple socket won’t work here because the entire
strut (including the stop plate) will rotate if you just try to pop it off
with a standard 21mm socket. There are three options here, as indicated in
the above tools section:
- An impact
gun. One or two blips with an air-powered impact gun will do the trick.
This is probably the easiest (but most expensive) way to get this done.
I couldn’t convince myself to blow $500 on a set of air tools for
this one job, however, so I didn’t do this.
- There’s
a part from Potterman’s (www.parts4vw.com) called the "Strut
Nut Tool (Top)". It looks like this:

It’s basically a 21mm socket with a hole through the middle for
you to stick an allen wrench into the strut, and a nice hex-shaped portion
for you to grab with your favorite torque-inducing object (i.e. pliers/vice
grips/adjustable wrench). This allen wrench sticks into the middle of
the strut, and can be used to hold the whole unit while you loosen the
nut. Note that the average 13/16 spark plug socket may work for this purpose
as well if you can’t get a hold of the special tool.
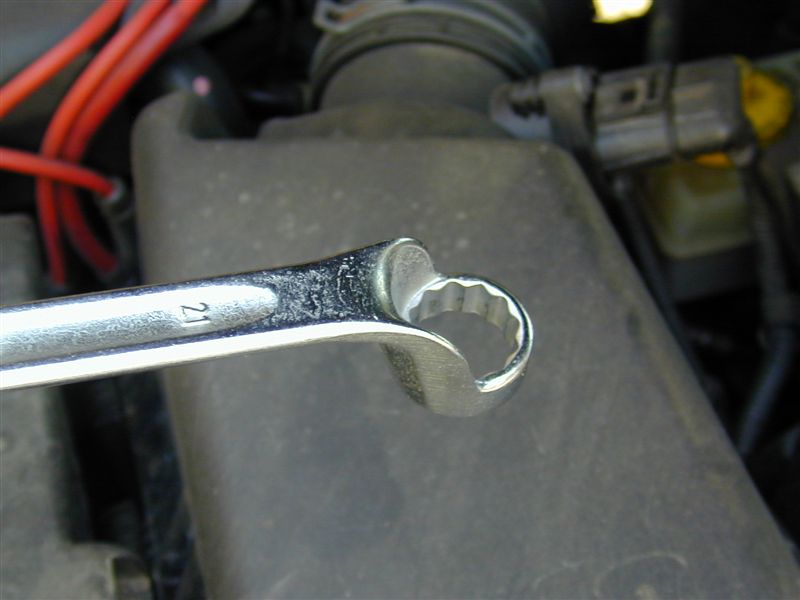
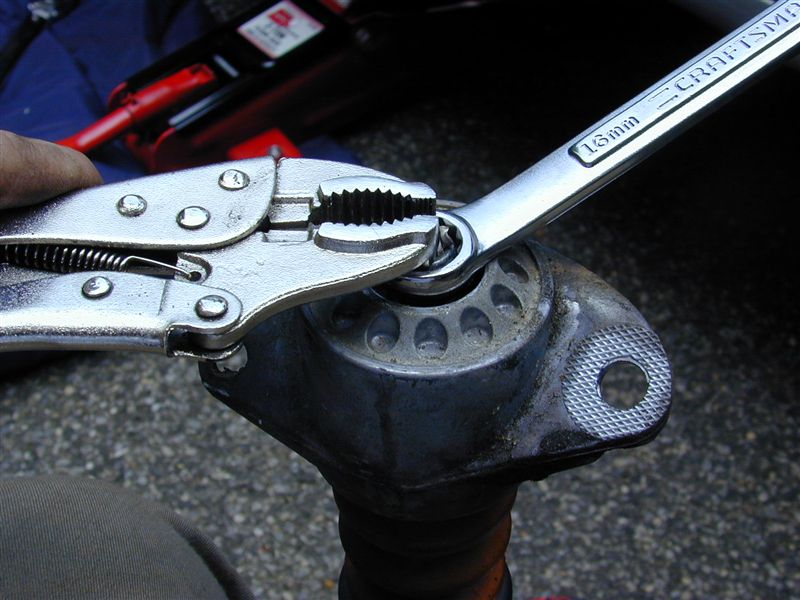
- This
is the method I used: There's a German tool manufacturer called
Stahlwille that makes a set of 60-degree deep-offset wrenches. These wrenches
in particular happen to be the right size/angle to fit into the well around
the top nut and can be used quite successfully to get it off in combination
with an allen wrench. Someone suggested this method to me, so this is
why I did it. Part #s can be found above.
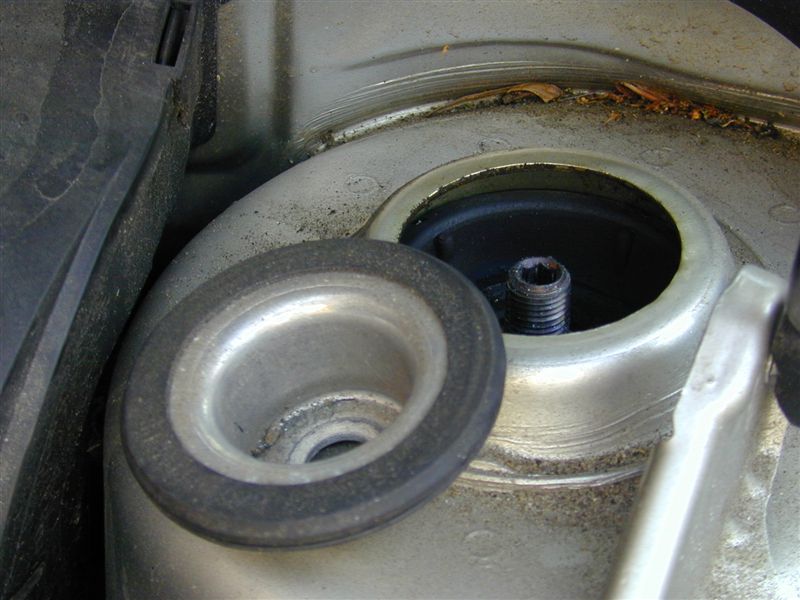
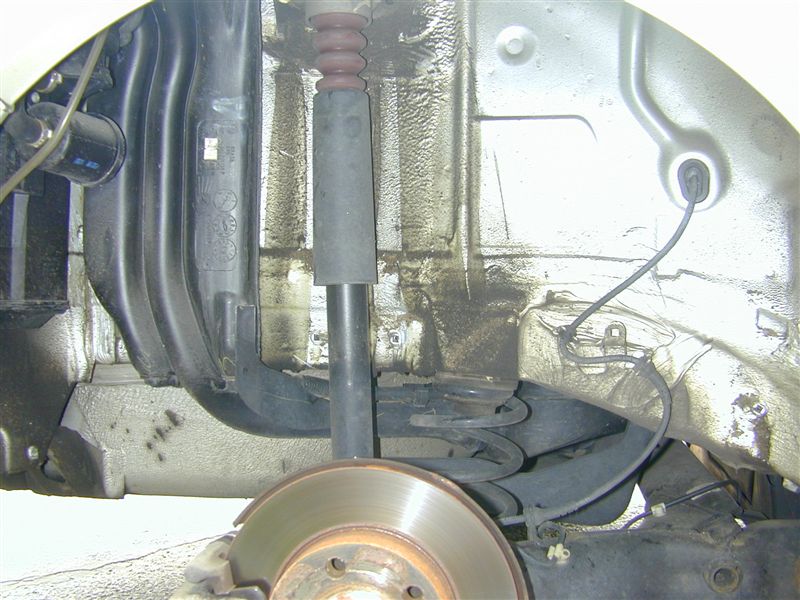
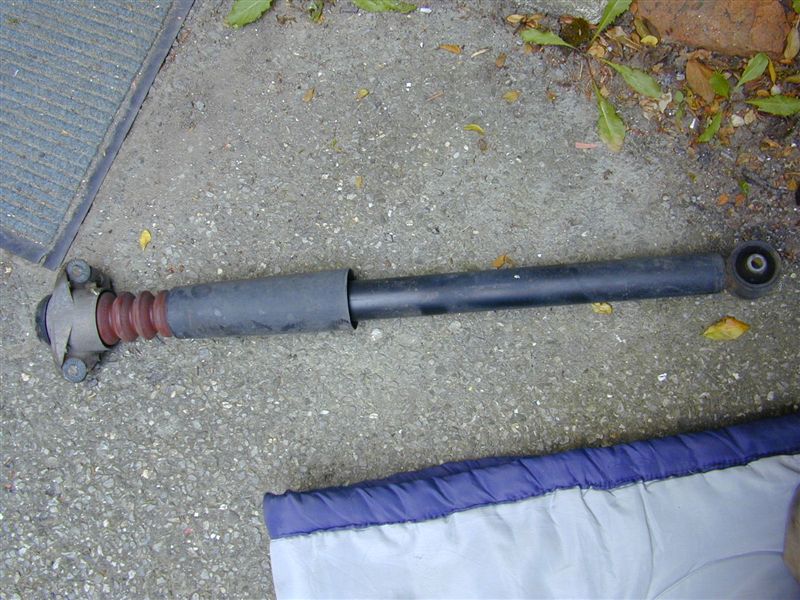
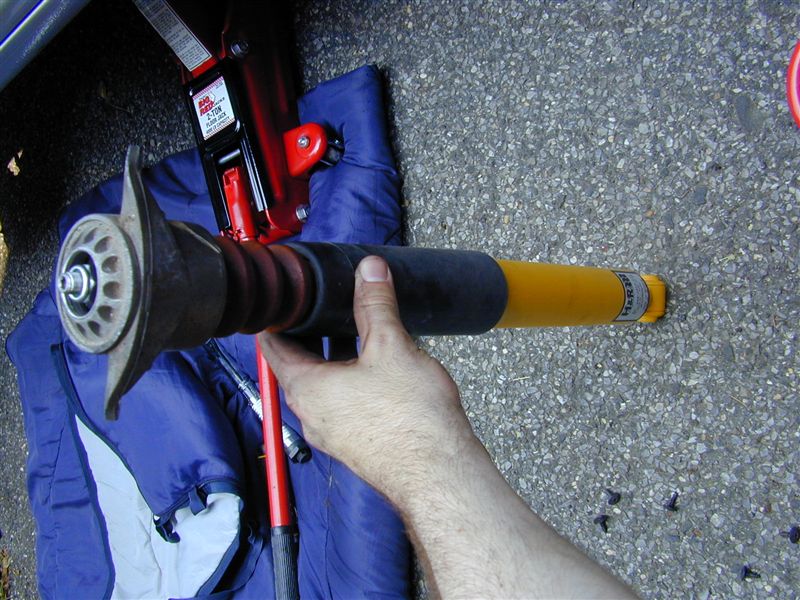
- Once the stop
plate is off, you can then lower the floor jack below (see? told you it would
be a good idea to use one...) and take out the entire strut assembly.
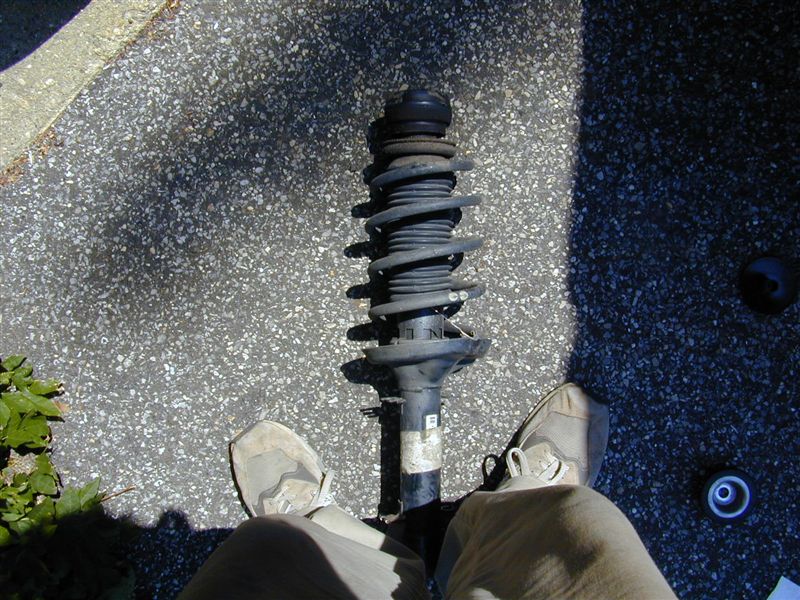
My, what a big....shock absorber....you've got there.
- Since I only purchased new Upper Strut Mounts and didn't
get new Upper Strut Bearings (yet), I needed to take apart the old strut assembly
to re-use some parts. The next few steps are only necessary if you need to
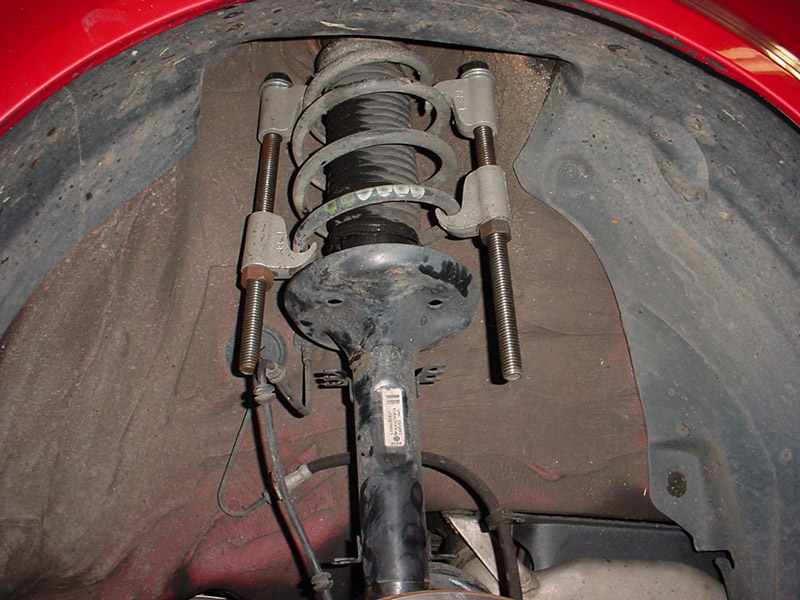
those two parts. Attach the spring compressor.
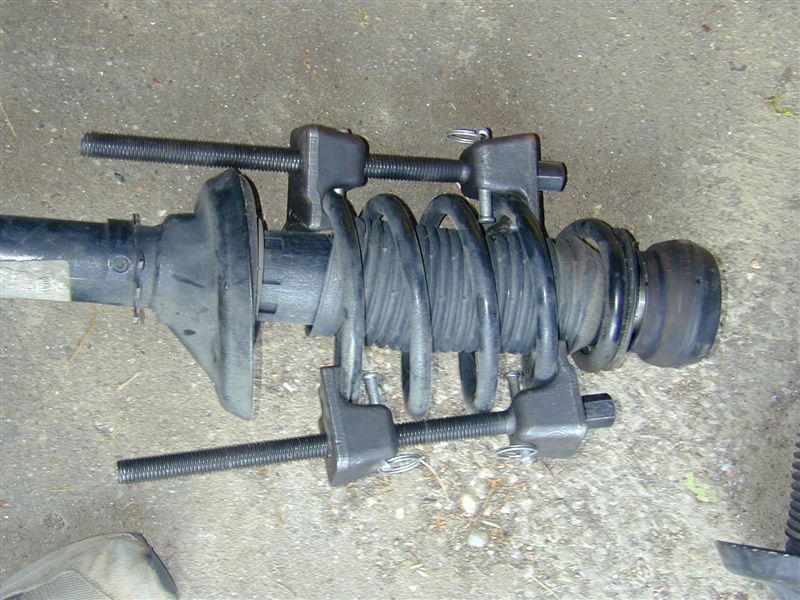
- With the spring compressor attached, you can safely remove the inner top
strut nut. NOTE: Only do this when you're sure you've properly
attached the spring compressor. Otherwise, you risk sending a very powerful
spring into your face/fingers/etc. This will hurt more than you can imagine.
The inner nut is a bit of a pain to get out, because the Stahlwille wrench
doesn't quite fit inside the rubber strut mount (it's a hair too wide). So
your best bet for this step is either to use your own spring compressor, use
the Potterman tool / sparkplug tool, or to do what I did which was to take
the whole thing to your friendly neighborhood gas station and ask the guys
there for a quick "blip" from their air gun. This worked very well.
Once the nut is off, everything comes out pretty easily.
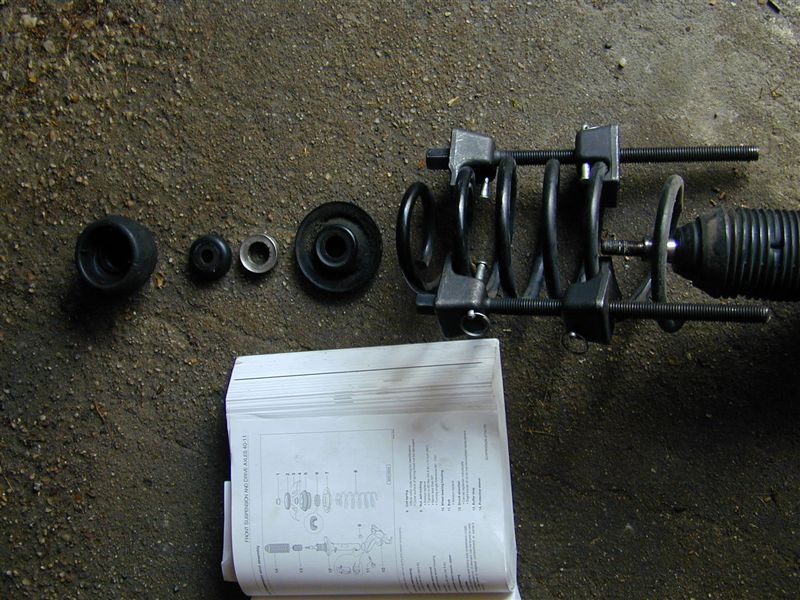
- The parts you see above are, from bottom to top, the shock, the spring+compressor,
the spring plate, an aluminum spacer, the upper strut bearing, and the upper
strut mount. NOTE: This aluminum spacer is a bit of a mystery to me. The Bentley
makes no mention of it, nor did any other how-to I found on the net. The only
mention I could find of this piece was on some random thread on vwvortex.com,
where half the people said to re-use it and the other half said not to re-use
it. So I don't know what to say. I re-used it, and I haven't had any problems.
Update: The aluminum spacer seems to be not a great idea,
as it prevents full tightening of the inner nut and has lead to cracking of
the upper strut bearing. I'd suggest leaving it out, however you may find
a gap exists between the top stop plate and the frame of the car once everything
has been reassembled. From everything I've read, this is normal and isn't
bad.
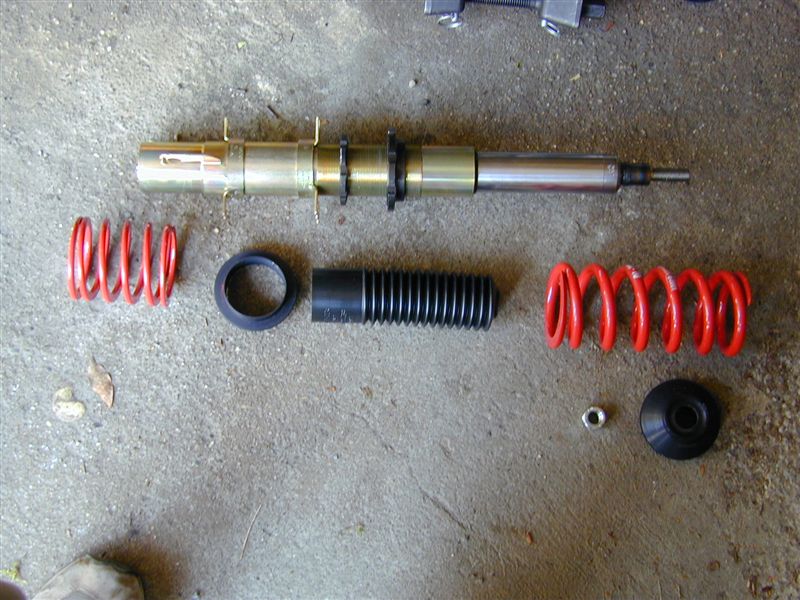
- Now it's time for the fun part -- to assemble your coilovers! Take all the
parts out of the box and make sure you have everything shown below (for each
side). The pieces are, from left to right and top to bottom: 22mm (NOTE: not
a direct replacement, as the OEM part is 21mm) outer nut, spring
plate, helper spring, separator thingy, dust cover, main spring, and, of course,
the coilover body.
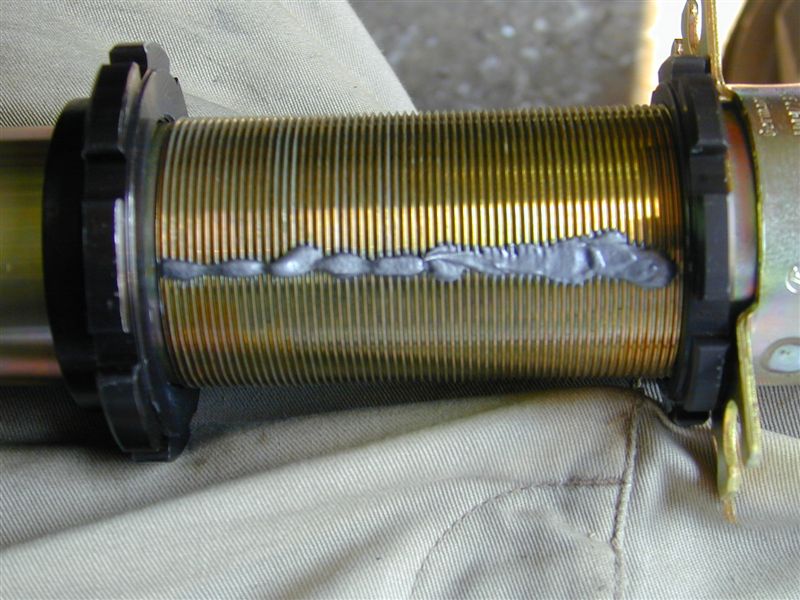
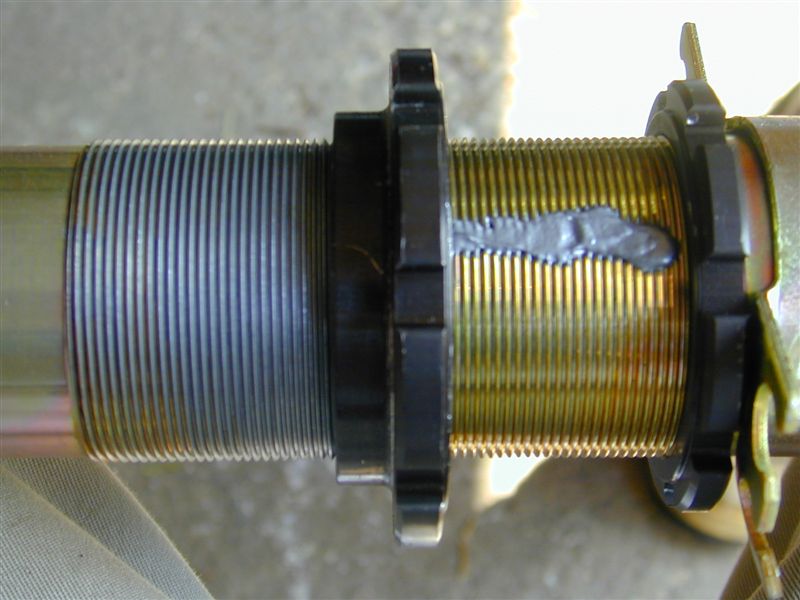
- The first step is to make sure you're properly lubed up (isn't it always?).
Since you're probably going to be adjusting the height of these things, it's
best to coat the threaded body with some anti-seize lubricant to make your
life easier. Remember, these things are going to faced with salt, water, dirt,
etc., so keeping things greased can always help. I applied it by moving the
two height-adjustment pieces to opposite ends of the body, applying a thin
layer of grease, and spinning one piece to the other side.
"Lunchlady Doris, have ye got any grease?"
"Yes, yes we do."
"Then grease me up, woman!!"
- It's easiest to assemble the pieces if you set the coilover to its lowest
possible setting (all the way down). Put on the dust boot, the helper spring,
the separator thingy, the upper spring, the new spring plate, the aluminum
spacer, and the strut bearing, in that order.

- Then, place the upper strut mount on, attach the old 21mm inner nut, tighten
to 44-ft-lb (as the Bentley suggests) and LISTEN IN HORROR AS YOU HEAR YOUR
$^%@%$! UPPER STRUT BEARING CRACK INTO MANY PIECES.
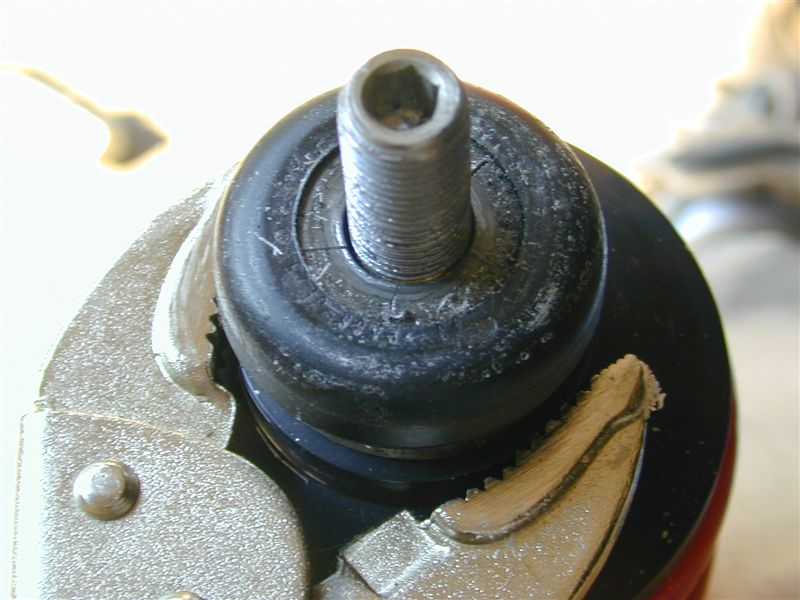
Broken upper strut bearing from over-tightening the inner nut. See the little
hairline fractures? Those suck.

- Ok, so the lesson here is that the Bentley's suggestion of 44ft-lbs is wrong
when dealing with a new suspension setup. Use a torque wrench, and tighten
to something less than 44ft-lbs (I'd suggest 30 - 35, but I don't have an
exact number).
Update: Someone very wisely pointed out that the reason 44
ft-lbs cracked the bearing is the presence of the aluminum spacer. Supposedly
if you don't have the spacer there, you should be fine to tighten to full
torque spec and all should be well. Duly noted.
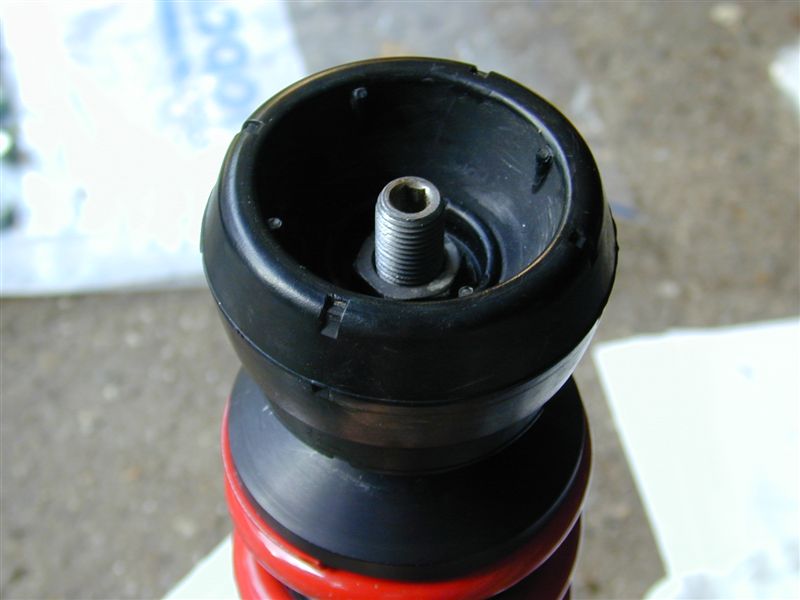
Properly done with a new upper strut bearing (not shown) and the upper
strut mount installed.
- Once you've got the whole thing assembled, it's time to install this puppy
back in the car. I chose to raise the height from the lowest position to the
highest position, so that I could then lower the car as desired (I didn't
know how low I wanted to go, so I figured I'd start high and work my way down.)
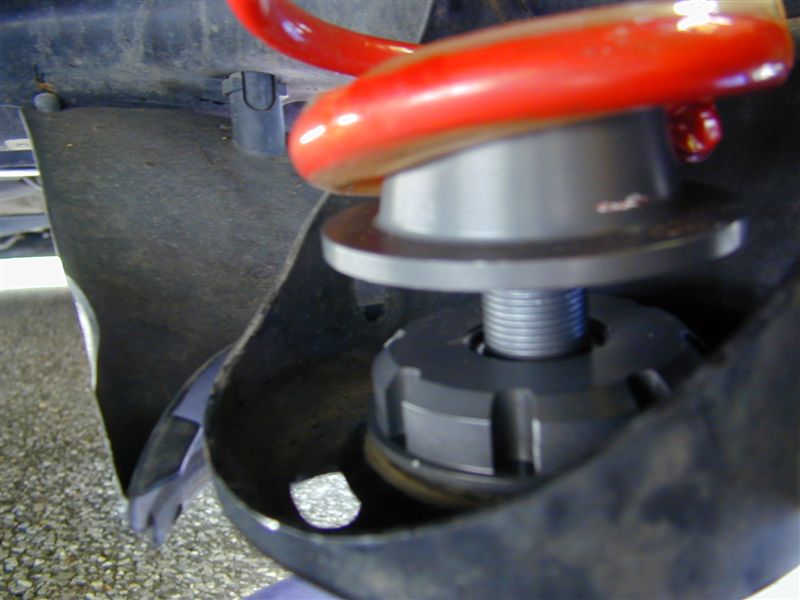
- The first problem I ran into was the discovery that the H&R coilover
body is a hair thicker than the stock strut. This means that with the spreader
tool still in place, the coilover won't seat properly in the strut mount.
Note the 2mm of visible gap where it's seated
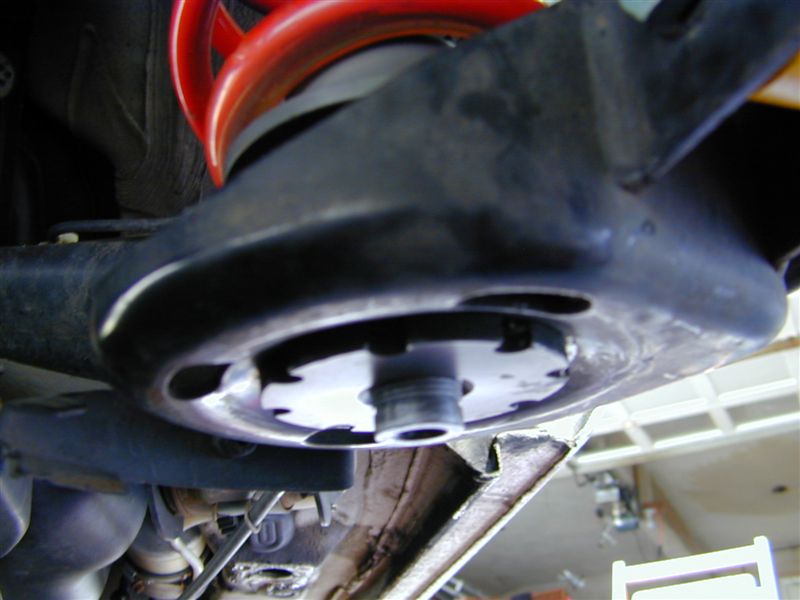
- What I needed was a way of getting the spreader tool to spread just
a bit more. The solution I settled on was to a) insert the coilover as far
as it can go, b) remove the spreader tool, and c) wedge a nickel in between
the spreader tool and the lower strut mount to get that extra few mm of spreadage.
This worked, and the coilover popped right in.
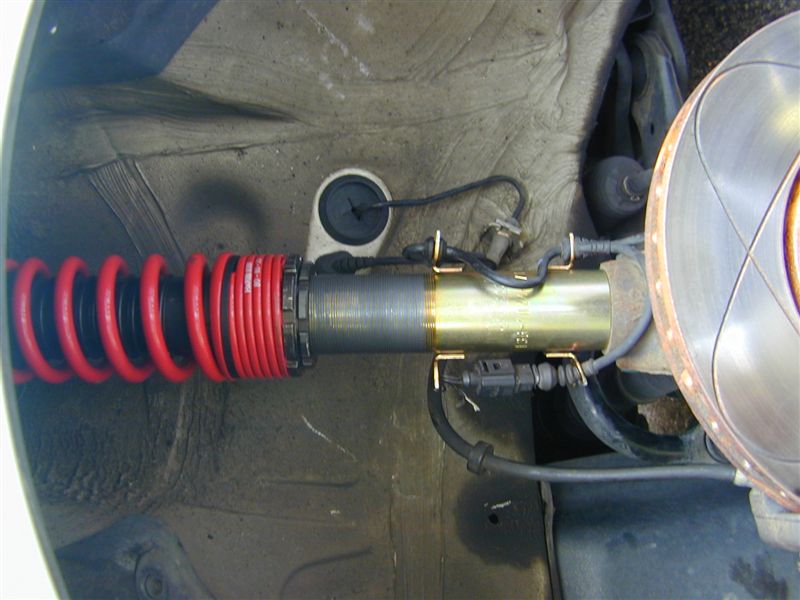
No more gap. Note the unit is set to maximum height.
- With the coilover properly seated, install the lower strut mounting bolt
and tighten the nut to 44 ft-lbs + 1/4 turn.
- Raise the floor jack and guide the coilover into position up top.
- Attach the stop plate and new (included with the coilovers) 22mm outer nut.
Tighten to 44 ft-lbs using either the Stahlwille wrenches, the Potterman tool,
or very carefully using an impact gun.
- Re-attach the
wheel, and voila...all done with this side. Take note of the drop, and adjust
to suit. When it's at a height you like, take care to accurately measure the
thread so you can adjust the other side to the same height on the first go.
Passenger's Side:
This side is similar, but
one part makes it significantly more complicated. That is, that just jacking
up the car and taking off the wheel does not give you enough clearance to pull
out the stock assembly like on the driver's side. There are three ways (that
I know of) to go about doing this:
- "Lower the subframe"
-- this is the most commonly talked-about method, but to be honest, I couldn't
find one good description of exactly what needs to be done to accomplish
this. I've seen mention of removing the four "subframe bolts"
but I don't know which bolts people are referring to. So I'm no help on
this one. Obviously, this is not the method I used.
- Detach the right side
drive axle -- this is the method the Bentley uses to remove the stock suspension.
It involves getting way under the car and detaching the drive axle from
the transmission drive flange, and involves taking out several 12-point
bolts (this requires a special tool). Since I had neither the special tool
nor the desire to mess with my drive axle, I didn't do this either.
- Make your own space
-- this is what I did. It involves compressing the spring whilst still installed
and using that to get some leverage. I like this method, as it doesn't involve
messing with the rest of the car and does the double job of taking apart
the old assembly at the same time.
The steps are as follows:
- Repeat steps 1 - 5 above.
- With your adjustable
jack placed under the control arm (as on the other side), jack up the control
arm so that the spring becomes compressed.
- Now, attach the spring
compressor to the already compressed spring and tighten. This will hold the
spring in place. This may be a bit tricky, as the spring compressor might
be a tight fit (you may have to install it upside down depending on what model
you have).
Update: Nick Lehmann (nice last name, eh?) was kind enough to send
me a picture of the above step as he was completing his suspension install:
- With the spring nicely
compressed, follow steps 6 - 8 above.
- The strut should be
loose -- but not out of the assembly. Now, jump to step 10 and do that and
step 11.
- You should now be in
a situation where the strut is detached from the top and loose from the lower
strut mount. Don't lower your jack quite yet. Next thing you'll do is perform
step 14 while the strut is still in the car.
- Once the inner nut is
removed, you should be able to remove all the "extra stuff" (i.e.
bearing, spacer, spring plate). That, or it'll just fall down, which is fine.
- Now, lower your jack
to let the control arm go as low as possible.
- As you'll see, you have
some leverage now. If you lower the strut back into the spread-apart lower
mount, you should be able to angle it such that you can pull the whole thing
out.
- Continue with steps
16 - 27 as above.
Once you've completed installation
of the fronts, congratulations! The hardest part is done. Now on to the easy
stuff.
Part II - The Rear
Both sides are pretty much
the same here, with one slightly annoying exception on the passenger's side,
which I pointed out.
- Ok let's get started.
First, jack up both sides, remove the wheels, and put the
car on jackstands. Note that I did this a little differently in my pics (i.e.
the wheel's still on and no jackstand) but I discovered that wasn't necessary,
even though the Bentley says it was. Just follow along. NOTE: It is important
to make sure that you have both sides jacked up when you do this, otherwise
you'll meet incredible frustration (like I did) when you can't seem to figure
out why you can't get the spring out.
- On the passenger's side
there's this really annoying dust liner that's positioned JUST so as to block
your being able to get the upper shock bolt out. Unless you have an impact
gun, you'll need to remove this liner (a bunch of Torx screws).
Update: Several folks have reported that the liner doesn't seem to
be a problem on some Golfs/GTIs and on later-model (i.e. 2002) Jettas.
- Optional -- because I
had to go back in several times, this liner became a real PITA. So I just
cut out the part the blocks the bolts so in the future, I can just rip right
in.
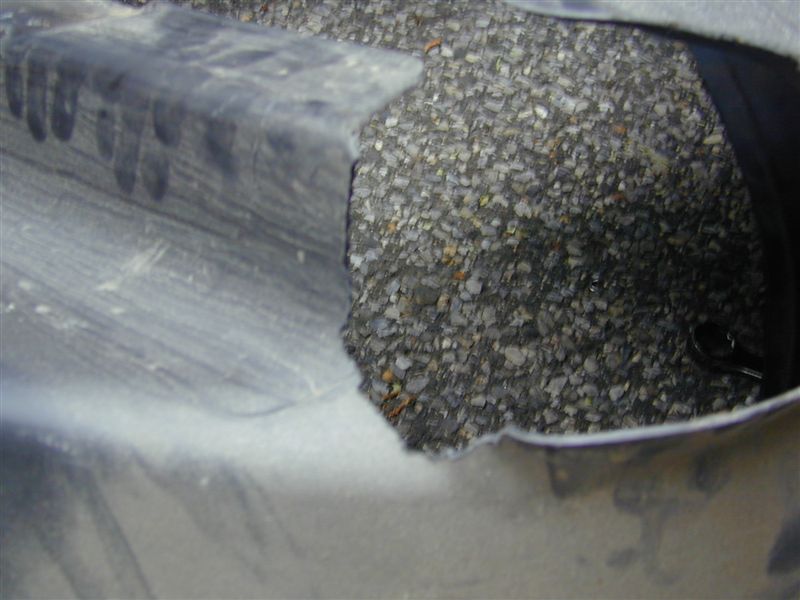
See? It fit good now.
- Place your floor jack
under the rear control arm and jack it up so that the spring's compressed
slightly.
- Now, remove the two
16mm upper shock bolts.
- Once these are removed,
slowly lower the jack. The shock should come down nice and easily, and the
spring should pop (fall) right out.
- Next, remove the lower
shock mounting screw and bolt, using your 16mm open-ended wrench to counter-hold,
and remove the shock.
- You'll need to reuse
a few pieces from the OEM shock/spring, namely the upper shock mount and dustboot
(from the shock) and the bumpstop (plastic thing on top of the spring, above).
- To remove the upper
shock mount, use a combination of a 16mm open-ended wrench (no need for deep
offset here) and a pair of vicegrips, similar to the technique used on the
front.
- Once it's removed, re-install
the shock mount and dustboot on your new H&R shock, using the included
replacement 16mm bolt.
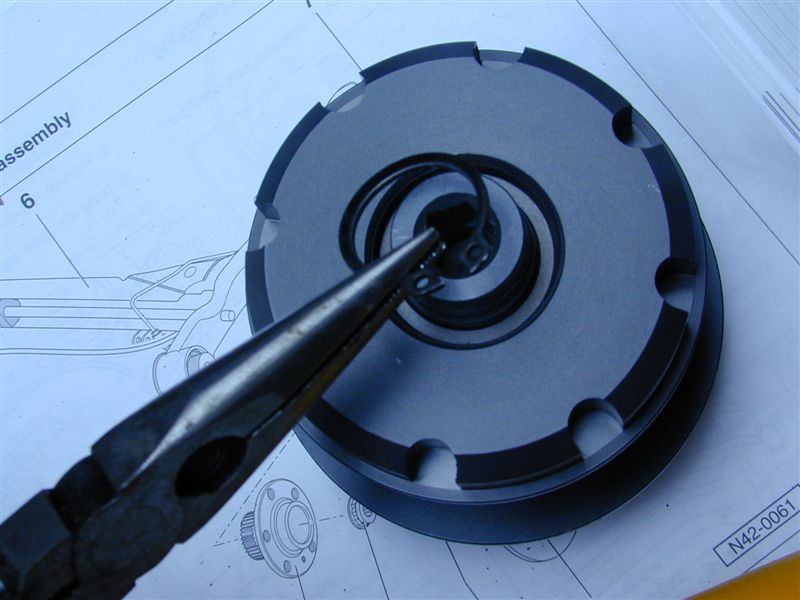
- Now, on to the rear height-adjustment
perches. These things are a bit odd to figure out if you've never seen them
before, but you actually have top disassemble them and "sandwich"
the rear spring mounting point on the car. To disassemble the perches, you'll
need to first remove a small metal retaining clip (that keeps them from completely
unscrewing).
- Like the fronts, grease
up the rear perches with anti-seize, and install as pictured.
- Be sure to tighten the
locking rings on the adjustment perch to squeeze the control arm. Note, this
is different from the front -- you don't actually touch the rings to adjust
the height on the rear. Rather, this can be done by sticking an allen wrench
in the bottom of the perch and rotating the center piece directly. On my setup,
however, the spring had a grippy piece of rubber around the bottom, making
turning the unit very difficult without actually removing the spring. I haven't
quite figured out how to get around this, but then again I found the ideal
drop and aren't planning on changing it.
- Like the front, take
note of the amount of thread on the adjustment perch when you've gotten it
to a height you like. Make sure to adjust the other side to the same height
to keep things even.
- While this side is still
detached, now would be a good time to perform steps 1 - 13 on the other side.
If you reinstall the new shock and attach it to the upper shock mounting bolts,
you'll find yourself unable to remove the stock spring from the other side.
- Install the shock, attach
the lower shock mounting bolt + nut, and tighten it up (44 ft-lbs).
- Now perform steps 1 -
15 on the other side.
- Once both sets of shocks
and springs are installed, jack up each side and line up the upper shock bolts.
Install these and tighten to 55 ft-lbs.
- Double-check all your
work, put your wheels back on, lower the car, and take a look. This is where
the anal part comes, and you get to figure out how much drop on each side
you want. Note that on my setup, even with the rear perches set to the exact
same height, my left side was 1cm higher than the right. Some said this is
due to compensation for driver weight, others say this is just the way the
car works out. If you're feeling very anal, you can adjust the heights to
be dead-on equal.
- You are now DONE!!!
Congratulations. Go for your maiden voyage, and be sure not to drool on yourself
when you start grinning. :)

